 Random image Random image |
 |

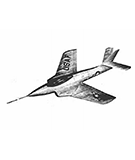
F-84F THUNDERFLASH
nitrocharged
|
 |
|
 |
 |
JEX-JET
| JEX-JET |
| Description: |
This design, made as stable as possible for use by beginners, is almost impossible to loop because of its long tail moment arm.
Adjustment is quite easy. The stabilizer is set at the angle shown, the engine position shifted to obtain the best gliding angle. Then the Jetex engine is permanently fastened and powered flights are a cinch. More about that later.
Interested? Well, stock up on some very soft 1/16 sheets, that is the pri-mary size used. We used Sig 'Contest Balsa' in our model. From the full size plans obtain the proper outlines for the fuselage sides and top panel piece. Also cut out all required formers and rudder parts. Cement the side pieces to the nose block; be very careful to line up the sides. Pinning the tail ends of the side pieces together with help. Cement former A in place, then the fuselage top panel, which rests against the back Of A and is flush with the upper edges of the side pieces. The formers cement in the places shown on the plans. The bottom sheeting is next - when the cement has dried thoroughly, the sheeting is trim-med flush with the side sheeting.
The roof of the cabin area is cut out of very hard balsa or pine, shaped, and cemented in place. The celluloid windshield and side windows are added. When cementing the rudder to the fuselage. |
| Keywords: |
jex jet jetex |
| Date: |
03.03.2021 06:36 |
| Hits: |
2919 |
| Downloads: |
9 |
| Rating: |
0.00 (0 Vote(s)) |
| File size: |
48.1 KB |
| Added by: |
nitrocharged |
|
|
 |
